New Techniques in the Manufacture of Platinum-Iridium Mass Standards
Journal Archive
New Techniques in the Manufacture of Platinum-Iridium Mass Standards
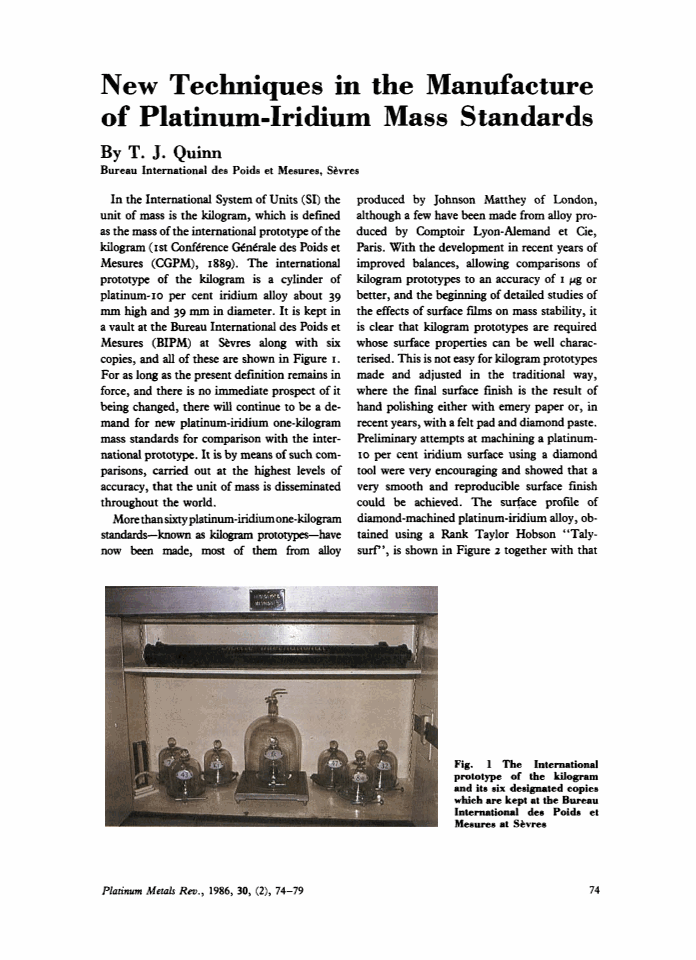
In the International System of Units (SI) the unit of mass is the kilogram, which is defined as the mass of the international prototype of the kilogram (1st Conférence Générale des Poids et Mesures (CGPM), 1889). The international prototype of the kilogram is a cylinder of platinum-10 per cent iridium alloy about 39 mm high and 39 mm in diameter. It is kept in a vault at the Bureau International des Poids et Mesures (BIPM) at Sèvres along with six copies, and all of these are shown in Figure 1. For as long as the present definition remains in force, and there is no immediate prospect of it being changed, there will continue to be a demand for new platinum-iridium one-kilogram mass standards for comparison with the international prototype. It is by means of such comparisons, carried out at the highest levels of accuracy, that the unit of mass is disseminated throughout the world.
Fig. 1
The International prototype of the kilogram and its six designated copies which are kept at the Bureau International des Poids et Mesures at Sèvres
More than sixty platinum-iridium one-kilogram standards—known as kilogram prototypes—have now been made, most of them from alloy produced by Johnson Matthey of London, although a few have been made from alloy produced by Comptoir Lyon-Alemand et Cie, Paris. With the development in recent years of improved balances, allowing comparisons of kilogram prototypes to an accuracy of 1 μ g or better, and the beginning of detailed studies of the effects of surface films on mass stability, it is clear that kilogram prototypes are required whose surface properties can be well characterised. This is not easy for kilogram prototypes made and adjusted in the traditional way, where the final surface finish is the result of hand polishing either with emery paper or, in recent years, with a felt pad and diamond paste. Preliminary attempts at machining a platinum-10 per cent iridium surface using a diamond tool were very encouraging and showed that a very smooth and reproducible surface finish could be achieved. The surface profile of diamond-machined platinum-iridium alloy, obtained using a Rank Taylor Hobson “Talysurf”, is shown in Figure 2 together with that of one of the early prototypes made in the late 1870s.
Fig. 2
These surface profiles were obtained with a “Talysurf” and show traces of part of the end-face of prototype No. 64, which was produced by diamond machining, and “C”, one of the early kilogram standards polished in 1878
In order to produce a kilogram prototype by diamond machining, however, it is necessary to devise a procedure which produces a cylinder having a smooth surface all over, whose height is very close to its diameter and whose mass is within 1 mg of 1 kg. In developing the new machining and adjusting technique it seemed appropriate to review the manufacturing procedures for the alloy at the same time. This note describes the new techniques that have now been adopted after discussions with Johnson Matthey Metals Ltd and the National Physical Laboratory, Teddington, both for the production of the alloy and for the diamond machining. First, however, a brief outline is given of the history of the production of kilogram prototypes and the traditional methods of shaping and adjusting them.
The International Prototype and Prototypes Numbered 1 to 63
The Convention du Mètre held in Paris in 1875 established the BIPM and charged it, among other things, with the conservation of the international prototypes of the metre and the kilogram and their comparison with national standards (1). It was first necessary, however, to make the said international prototypes and also a number of copies which were destined to become national standards. On the advice of H. Sainte-Claire Deville an alloy of platinum-10 per cent iridium by weight was chosen for the international prototypes of both the metre and the kilogram. Various attempts were made in Paris, in 1873 and again in 1874, to produce the required quantity of alloy, which was some 250 kg. An apparently successful melt of this quantity of the alloy was made on 13 May 1874 at the Conservatoire National des Arts et Métiers, but later chemical analysis had shown an unacceptable level of impurities and further attempts were abandoned. Instead, in 1878 Johnson and Matthey, later to become Johnson Matthey Limited, were asked to produce the alloy using improved techniques developed over a number of years by George Matthey in close collaboration with Sainte-Claire Deville and his assistant Jules Debray (2, 3). In 1879 three one-kilogram cylinders designated KI, KII and KIII were delivered, and from these the international prototype of the kilogram was to be chosen. Between 1883 and 1886 a much larger quantity of platinum-iridium alloy was produced by Johnson and Matthey, and from this forty kilogram prototypes and thirty metre bars were made; one of the metre bars being destined to become the international prototype of the metre.
It had earlier been agreed that the new international prototype of the kilogram should have a mass as close as possible to that of the Kilogramme des Archives, this being the original standard of the kilogram made in Paris in 1799 and adjusted to be as close as possible in mass to that of a cubic decimetre of water. The comparison of the three cylinders KI, KII and KIII with the Kilogramme des Archives was carried out in 1880 at the Paris Observatory, the BIPM not yet being equipped to undertake such a task. Prior to this, final polishing and adjusting of the three cylinders had been carried out by A. Collot a skilled balance maker and craftsman practising in Paris. These comparisons showed that among the three cylinders, KIII was closest in mass to that of the Kilogramme des Archives, in fact at the time its mass was indistinguishable from that of the Kilogramme des Archives, and in 1883 it was chosen by the Comité International des Poids et Mesures (CIPM) as the international prototype of the kilogram. This decision was formally ratified by the 1st CGPM in 1889.
The forty kilogram prototypes made from the Johnson and Matthey alloy in 1883/84 were all polished and adjusted by Collot at the BIPM, which had by then been equipped with the necessary workshop and laboratory facilities including a new balance made by the Rueprecht company of Vienna. Very little information has come down to us concerning the details of the machining and polishing procedures used by Collot. There does exist, however, a detailed description of the manufacture and adjustment of kilogram prototypes written in 1952 by A. Bonhoure (4), who was a member of the staff of the BIPM from 1912 to 1963. It seems probable that the method he described in 1952 was the traditional one, differing only in detail from that used by Collot. According to Bonhoure the ingot was first machined to within about 1 gram of its final mass and then all of the surfaces were finished and the mass adjusted using increasingly fine grades of emery paper. The final surface finish was that obtained using grade 00 or 000 paper. The adjustment of mass was carried out using alumina powder on a felt pad. It is clear that such a process, although easy to describe, requires a great deal of experience and skill and moreover results in a surface having a fine satin finish. Although not unattractive in aspect, it is not a surface whose properties are easy to specify. More recently, two kilogram prototypes made in 1974 were given a final polish and then adjusted in mass using a diamond paste on a felt pad. This resulted in a somewhat better surface finish, although difficulties were encountered in avoiding microscopic pits or inclusions on the finished surface.
The New Manufacturing Process for the Platinum-Iridium Alloy
The aim of the new manufacturing schedule for the platinum-iridium alloy is to produce a homogeneous alloy having a high density and a fine grain size suitable for diamond machining. The alloy is prepared by Johnson Matthey from virgin sponge of platinum and iridium and the specification requires that it should contain (10±0.25) per cent by weight of iridium and not more than 0.2 per cent in total of rhodium, palladium and ruthenium, less than 0.05 per cent of iron and not more than a total of 0.02 per cent of all other elements. The density of the final alloy should exceed 21,530 kg/m3.
The alloy is first Durville cast to the form of a block about 6 cm × 6 cm × 18 cm. It is then hot forged, between 1000 and 1300 °C, to a right prism 16 cm long and having a polygonal section 8 cm across. The forged billet is then delivered to the National Physical Laboratory where it is extruded at 1200 °C, using glass as the lubricant, to a cylinder about 43 mm in diameter. At this stage γ -radiographs are taken to confirm the absence of voids. Two disks are cut, one from each end, and sent to BIPM for examination for homogeneity. Spectroscopic and chemical analyses are also carried out. If the results are satisfactory the remainder of the ingot is sent to BIPM where it is cut into sections 43 mm in length. Experience has shown that we can expect to have enough material to cut seven such sections.
Machining and Adjustment of the Individual Ingots
Each section is first rough machined using a tungsten carbide tool to produce a right circular cylinder 40 mm in diameter and 40 mm long. A single pass with a diamond tool is then made to give a surface finish good enough to allow an accurate density determination to be made by hydrostatic weighing. The single-crystal diamond tool that has been found satisfactory for producing a good finish on platinum-iridium has a cutting face with a radius of curvature of about 80 mm (made by Contour Fine Tooling Limited of Stevenage). It is used with a synthetic oil cutting fluid (shell-75) and at a relatively low cutting speed, less than about 25 m min−1. Following the density determination, one of the end-faces of the cylindrical ingot is diamond machined to a good surface finish. A brass holding piece having a diamond machined surface is then glued to this face. The purpose of this holding piece is to allow the whole of the cylindrical surface together with one end-face and one set of bevelled edges to be diamond machined without the axis of rotation being altered. After mounting in the lathe (Hardinge Super Precision) the cylindrical surface is first machined to its final diameter of 39.17 mm and its final surface finish, then the end-face is similarly finished. A diameter of 39.17 mm has been chosen to be very close to the final length of the cylinder. At this stage, and without removing the ingot from the lathe, the first set of bevelled edges is machined. The shape of the resulting ingot is shown in Figure 3. The bevels are cut according to a predetermined plan so that a carefully calculated amount of material is removed at each stage. In order to do this with sufficient accuracy the lathe is equipped with digital position indicators having a resolution of 1 μ m on the longitudinal slide. In addition, a binocular microscope is mounted on the lathe so that the orientation of the tool with respect to the surface can be accurately adjusted. Figure 4 shows the successive stages of the bevelling which is designed to remove about 1500 mg from each end of the ingot. The 22.5° bevel is cut first and removes about 1300 mg, then the 45° bevel which removes 170 mg, next the 67.5° bevel removing 25 mg and finally a 79° bevel which is calculated to remove about 3 mg. Obviously, in cutting the first set of bevelled edges the total mass removed is not critical and is only nominally 1500 mg; it is during the machining of the second set, at the other end, that extreme care must be taken and frequent weighings carried out.
Fig. 3
This platinum-iridium ingot is still glued to the brass holding piece which supported it in the lathe while final machining of the cylindrical surface and one end-face was carried out
Fig. 4
The platinum-iridium ingot and its brass holding piece (a) are held in the nylon chuck (b) while the second end-face and the second set of bevels are machined. Successive stages of cutting (c) removes decreasing amounts of material as final adjustment of the mass is made. Bevel A is cut first
Having finished the cylindrical surface, one end-face and one set of bevelled edges, a final operation is carried out to remove microscopic burrs before the ingot is removed from the lathe and detached from the brass holding piece by gently heating to soften the glue. The burrs, which are extremely small and only just visible in the microscope, are removed from the bevelled edges by means of a small piece of hard wood coated with 0.1 μ m diamond paste. The identifying number is then lightly marked on the cylindrical surface using a stencil and a brush carrying a small amount of diamond paste. After cleaning in a warm soap solution, washing in distilled water and then in ethyl alcohol, the ingot is weighed. It is then mounted in a specially made nylon chuck so that the remaining end-face can be diamond machined and the final adjustment of mass carried out through the cutting of the second set of bevelled edges. At various stages during the final adjustment the ingot is removed from the chuck, cleaned and weighed; more frequently, of course, near the end of the process. When the bevel at 79° has been cut and the mass is about 1 kg + 2 mg, the final adjustment is made while removing the burrs from this second set of bevelled edges. This is done as before using a piece of wood carrying 0.1 μ m diamond paste. In this way it is easy to bring the mass down to within the required tolerance of 1 kg±1 mg. The final operation is the cleaning of the kilogram prototype to remove all traces of the cutting fluid. This is done by first washing in warm soapy distilled water, then rinsing in clean distilled water, then in a solvent (traditionally benzene but we now prefer safer equivalents) and then in alcohol while gently wiping with chamois leather. Finally it is subjected to a jet of steam from bi-distilled water, as is the usual BIPM practice for platinum-iridium standards. The mass of the new standard is then determined by comparison with the platinum-iridium working standards using the NBS-2 balance shown in Figure 5. This is a single-pan knife-edge balance having a mass exchanger that allows up to six one-kilogram masses to be compared with each other. Under the best conditions the mass of one kilogram can be determined in terms of a reference standard to rather better than 1 part in 109, that is to somewhat less than 1 μ g. The steam-cleaning procedure is repeated until weighings show that no further decreases in mass occur. Figure 6 shows one of the new kilogram prototypes alongside one made using the traditional methods.
Fig. 5
The NBS-2 balance at BIPM, with which 1 kg mass standards can be compared to better than 1 part in 109. This balance was made at NBS and presented to BIPM in 1970
Fig. 6
A kilogram prototype (No. 68) made using the new diamond machining process (left) and (right) “C” a standard made in 1878
The first kilogram prototype made using these new procedures of polishing and adjustment was given the number 64 in the BIPM series. Since then, numbers 65, 66 and 67 have successfully been completed. Also from the same ingot two platinum-iridium standards were made for NPL and were designated A and B. During the course of the development of the technique two standards were made whose mass was just outside the tolerance of ±1 mg. These were designated 650 and 651. A second ingot has been delivered by Johnson Matthey and the machining of a further group of kilogram prototypes is now well advanced.
References
- 1
T. J. Quinn, “BIPM—a profile”, J. Phys. E., 1985, 18, 368
- 2
J.-R. Benoit, “Rapport sur la construction, les comparaisons et autres opérations ayant servi à déterminer les équations des nouveaux prototypes métriques”, BIPM Travaux et Memoires, 1890, 7, 101
- 3
L. B. Hunt, “George Matthey and the Building of the Platinum Industry”, Platinum Metals Rev., 1979, 23, (2), 68 ; D. McDonald and L. B. Hunt, “A History of Platinum and its Allied Metals”, Johnson Matthey, London, 1982, pp. 271 – 299
- 4
A. Bonhoure, “La construction des Prototypes de Masse”, Microtechnic, 1952, 6, (4), 204
Acknowledgements
The author is pleased to acknowledge the assistance given by Johnson Matthey Metals Limited and the National Physical Laboratory in the development of the procedures described in this article. Many helpful discussions were held with J. Leroux of the BIPM workshop who carries out the machining and G. Girard, who does the weighing. It is a pleasure also to note that the work described in this article was carried out just one hundred years after George Matthey collaborated with the then recently founded Bureau International des Poids et Mesures in the manufacture of the alloy from which the international prototype of the kilogram and its copies were made.